 How to turn a frown into a smile.
A Frown is an Upside Down Smile.
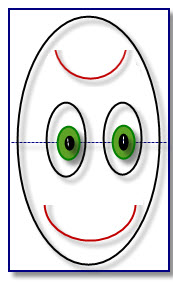
The diagram of the Smiley face represents how I felt when I started revising my website by deleted stuff that was not in use.
After permanently deleting 1000 pieces of art that were listed as being unassigned, I was still smiling. I felt like I completed a major clean-up chore.
Head held high and smiling, I proceeded to design new science investigations. It was several days before I started seeing posted material without art.
UUM!! More investigating and sure enough, all the art that I had deleted had been in use. My smiley face quickly turned to a sad face.
I felt like I had turned upside down, but not so. It was just my smile that had turned upside down.
I will be working on correcting this problem for some time, but will continue to add new material. I appreciate your patience and would ever so like to know if you find articles that are missing art and have other problems–links not working–etc… Please send this information to me at:
In fact, the idea of a smile changed into a frown and vise-versa made me think of the following demonstration.
The diagram shows how the smiley face looks when turned upside down. But instead of just rotating the paper. Have a little fun –add Add a little MAGIC and cause the face to turn upside down by folding the paper, and then unfolding the paper–of course you might want to add some magic words—Use your own or try the oldie goldie ones:
 Abbra Cadabra!
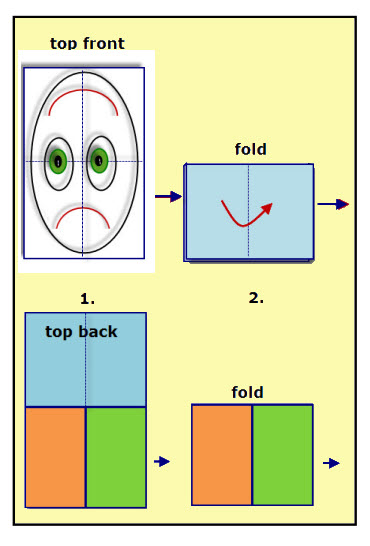
The diagram with the sad face shows the first two steps of folding the paper so that when unfolded the paper is upside down and what was a frown is now a smile.
Let me back up a minute–The first thing you must do is to prepare the diagram of the sad face. The face is drawn on a sheet of white copy paper. Before drawing the face, fold the paper in half twice, once from top to bottom and then from side to side.
The fold lines give you markers for where to draw the parts of the face.
You could color the backside of the paper if your wish. I used colors in the diagram to help you distinguish the front and back side of the paper.
Once you have the face drawn, then stand in front of a mirror, and using the steps shown on this page, practice folding and unfolding the paper.
Step 1. Holding the paper, stand in from of the mirror with the sad face drawing facing the mirror.
Mirror Image: The sad face.
Backside View of the Paper: If you look at the paper, you see its backside. In the drawing the backside of the paper is colored–the top half is blue, bottom half of the paper is shown to be orange and green.
Fold the top half of the paper forward.
Step 2.
Mirror Image: By folding the paper forward, the upper half of the backside of the paper faces the mirror.
Backside View of the Paper: With the top half of the paper folded forward, only the bottom half of the backside of the paper faces you.The left half is orange and the right half is green.
Fold the the paper in half along the previously folded lines. Following the diagram, you would use your right hand to fold the right half of the paper over the left half.
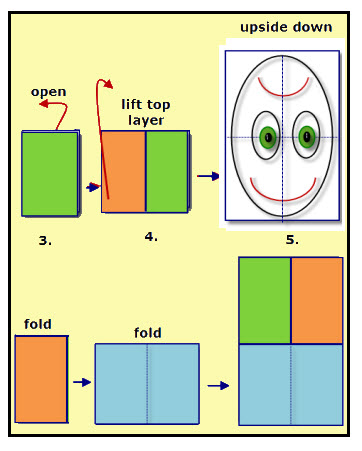
Step 3. WOW!! I was so sure that my diagrams were going to be crystal clear, but now I have my doubts. The problem is that one is a reversed mirror image.
Mirror Image: The bottom green half of the paper is visible.
Backside View of the Paper: The bottom orange half of the paper faces you.
Facing the mirror, unfold the paper by swinging the back half forward.
Step 4.
Mirror Image: The paper is folded in half with the bottom half of the backside of the paper showing–the orange and green parts.
Backside View of the Paper: In this position, the upper blue half of the backside of the paper faces you.
DRUM ROLL!! Say Magic Words!
Lift the top half of the paper. When you raise the paper, a smiley face drawing will be facing the mirror.
Teaching Tips:
1. It is easier for kids to see this demonstration if you make the drawing on a piece of poster board.
2. Produce a copy of the diagram for each student.
3. Demonstrate the folding of the paper diagram once. Then, give each student a copy of the diagram.
Instructions: Demonstrate the five steps so that the sad face on the paper rotates into a smiley face.
The objective is to see how many can repeat the demonstration just by making visual observations.
4. Depending on the age and abilities of your students, give out diagrams of each step, or suggest that they take notes as you repeat the demonstration.
The more kids are involved in any activity, the better able they are at retaining information.
FYI: Rhymes sung as kids jump rope uses most of their senses. These kids are said to be more likely to remember the rhymes years later, than would kids asked to read and memorize the rhymes. This is true for me–I can still sing the alphabet song as well and many other songs I learned in elementary school–but don’t ask me to list all the presidents–the capitals of each state–UUM! Maybe I should start writing science songs. First I’d have to learn how to write in rhyme.
