My goal is to create homeschool material on my website to provide ideas that will work for you. Many homeschoolers ask for ideas to expand experiments. In response to this, I have designed teaching tips that can be adapted to even the simplest experiment. But, these are just my ideas and they work for me, but I want them to work for you. To achieve this, as a homeschooler, I need your input.
An example of “my” teaching tips are shown below for an insect investigation, “Water Strider.”Note that I emphasize the tips are things that I have designed. While I am comfortable with the science content of the tips, I need input from homeschoolers to add the “homeschool” flavor. As I work more with homeschool educators, I am learning new techniques and ideas that not only makes science more homeschool friendly, but more kid friendly–regardless of where their “classroom” is located.
If you wish to be part of the developing of free homeschool science investigations, follow the instructions for “Variable Identification: Water Striders.” Then, send me your comments, or if you post your science investigations on a website, send me the link.
Just tell me how you used the investigation with your kids. Pictures of the experimental process as well as result would be great. Did you have to substitute materials? If so, what did you use. Is there a way to make the activity for fun? If you have ideas for connecting this activity to other curriculum, send them. Maybe a story book about water striders or other water insects. Possibly add a little math or write a story–etc…. The more ideas the better will be the product.
For research about the insect you are modeling, see Insects: Water Striders
For information about surface tension of water, which is a big part of why striders can walk on water, see Cohesion: Surface Tension.
Control: Make a Water Strider Model
Read all the tips before starting the investigation.
Tip 1: Control- A control is a standard-something you use as a benchmark-something you compare other testing results to. I am providing the instructions for the control, which for this investigation is a paper model of an insect called a water walker.
Note: The test models are described later.
Tip 2: The purpose given for the control describes the expected results for the investigation.
Results: For this investigation, the result is an insect model that will stand on the surface of water.
Tip 3: If you have several children, the control model as well as the test models could be prepared at the same time. Each child could prepare a different model, one child makes the control model and others make different “experimental test models.
Tip 4: Variables are things that can change, such as the type of paper used or the shape of the model. Changing a variable could possibly affect the results of an investigation. Before following the procedure to make the control model, make a list of the variables in each procedure step. I have listed many of the variables as examples. Once kids understand what a variable is, they will be able to easily recognize them.
The list of variables will be used to design questions used to construct the test models. Just hold this thought and keep reading–it will all be crystal clear soon.
Purpose: To make a control model for a water strider, an insect that can stand on the surface of water.
Procedure
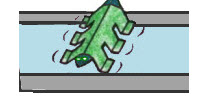
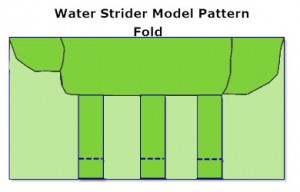
1. Fold a 3-by-5-inch white, unlined index card in half by placing the long sides together. Yes! My diagram is green, but that is to make it more visible–the diagram is also very lame, but it works, making it a good control.
2. Use the pattern shown to draw an insect on the folded card. Note that the insect diagram shown has three body parts–a head, thorax, and abdomen. The three pairs of legs are attached to the center body part- the thorax.
3. Cut out the insect, cutting through both layers of paper.
4.Use a pencil to draw lines separating the body parts. Using only the pencil add any other features to the paper model–these have not been added to the pattern.

Surface tension is the result of cohesion-the attractive forces between like molecules on the surface of a liquid. Surface tension creates what acts like a thin skin across the liquid’s surface.
5. Bend the bottom 1/2 inch of each leg to form “feet.”
6. Rub a thin layer of petroleum jelly on the bottom of the insect’s feet.
7. Fill a shallow baking rectangular baking pan with about 1/2 inch of cold tap water. You want enough water to cover the bottom of the pan so that the insect model can stand on the water’s surface.
How to Test the Insect Models
You can test the control model now or wait until you have constructed test models, then test them at the same time in the pan of water.
1. Gently place the control paper insect model on the surface of the water in the pan. The insect should stand on the water’s surface.
2. Repeat step one to test the other models. Compare all models to the control. Do they stand on the water as well as the control model? You could use a scale of 0 to 10 with the control model having a value of 5. Testing models that stand on the water better than the control model would have a rating greater than 5. Testing models that do not stand on the water as well as the control model would have a rating less than 5. Zero rating indicates the model sinks.
Variable List for Each Procedure Step
1. Index card: size, color, no lines–
Use other types of paper (heavier–lighter)
Use something other than paper to make the insect model
How the card is folded
2. Use a different pattern–since it is an insect it has to have three body parts and three pairs of legs–could have antennae.
3. I don’t see any variables here–if you do then add them to the list.
4. Use some other type of marker–crayons, etc…
5. How much of the leg is bent–or no bending at all
6. Petroleum jelly-don’t put any on the feet, use other types of oil
7. Water: type of water (distilled-salt-soapy, etc…), temperature of the water (warm, icy, etc…)
Bowl size:larger circumference, deeper, more shallow, etc….
Tip 4: Follow the procedure steps to make what will be called your “control insect model.” If you have to make a substitute for any of the materials, then what ever you use becomes the materials for your control insect model.
Tip 5:
Experimental Test Model Example: Pick one of the variables from the previous list, such as changing the shape of the pattern. Keeping the variables the same, if possible, make insect models with different shapes. Note that you are not just making one new shaped insect, instead, make several–as many as you want. But, change only the shape.
Most Important: Only test one variable at a time. This means that an experimental model could be made for each of the variables listed for the procedure steps. It would be tiresome testing all the variables, so pick some that are more likely to produce a different result.
Tip 6: Write out a question for each experimental model and give a hypothesis, which is a prediction about what you think will happen. This should be more than a wild guess, so I suggest you give clues to get the kids to thinking about reasonable results.
For example:
Question: What effect would the insect’s shape have on the insect model being able to stand on water?
Hypothesis:
This is an educated prediction. The objective is to encourage kids to analyze the question and no matter the age or science background, good reasonable “guesses” can be made. But, it is my experience that kids want clues from you. So, give them some. Introduce a few ideas to get things started, such as:
Are all insects the same shape? (no) Do all insects stand on water? (UUM! Since we have not seen every insect stand on water, this answer could be “maybe,” or “not sure.” Since the objective is to encourage kids to think, all answers are wonderful.
Sum up the hypothesis so that kids have an example. Since it is not a wild guess, something like this could be used:
If only some insects can stand on water and since water striders have long legs, then insects with short legs cannot stand on water.
Experiment:
1. Make the “control insect model.”
2. Design patterns for “insect test models” with legs of different lengths.
3. Test each insect model by standing them on the surface of water.
Tip 7: Changing only one variable –the length of the insect model’s legs–allows you to observe the affect of that this change has on the results, which is whether the paper models will stand on the surface of the water.
Analyze Results:
Tip 8: Compare the results for each of the models to the result for the control model results.
Conclusion:
Tip 9: Read the following example conclusions and decide which is more scientifically correct.
If all of your insect models are able to stand on water regardless of leg length.
1. Changing the length of the legs on the insect model didn’t affect the models ability to stand on water. Thus, insects with short, medium or long legs should be able to stand on water.
2. Changing the length of the legs on the insect models didn’t affect their ability to stand on water. While this was true for the materials used to make the models, there is not enough information to compare this to real insects.
Remember: If you are interested in sharing your experiences, asking questions, giving suggestions or comments, send them here CONTACT JANICE


